
Friday, March 29, 2013
SE400 Embroidery File Download Tutorial
Tuesday, March 26, 2013
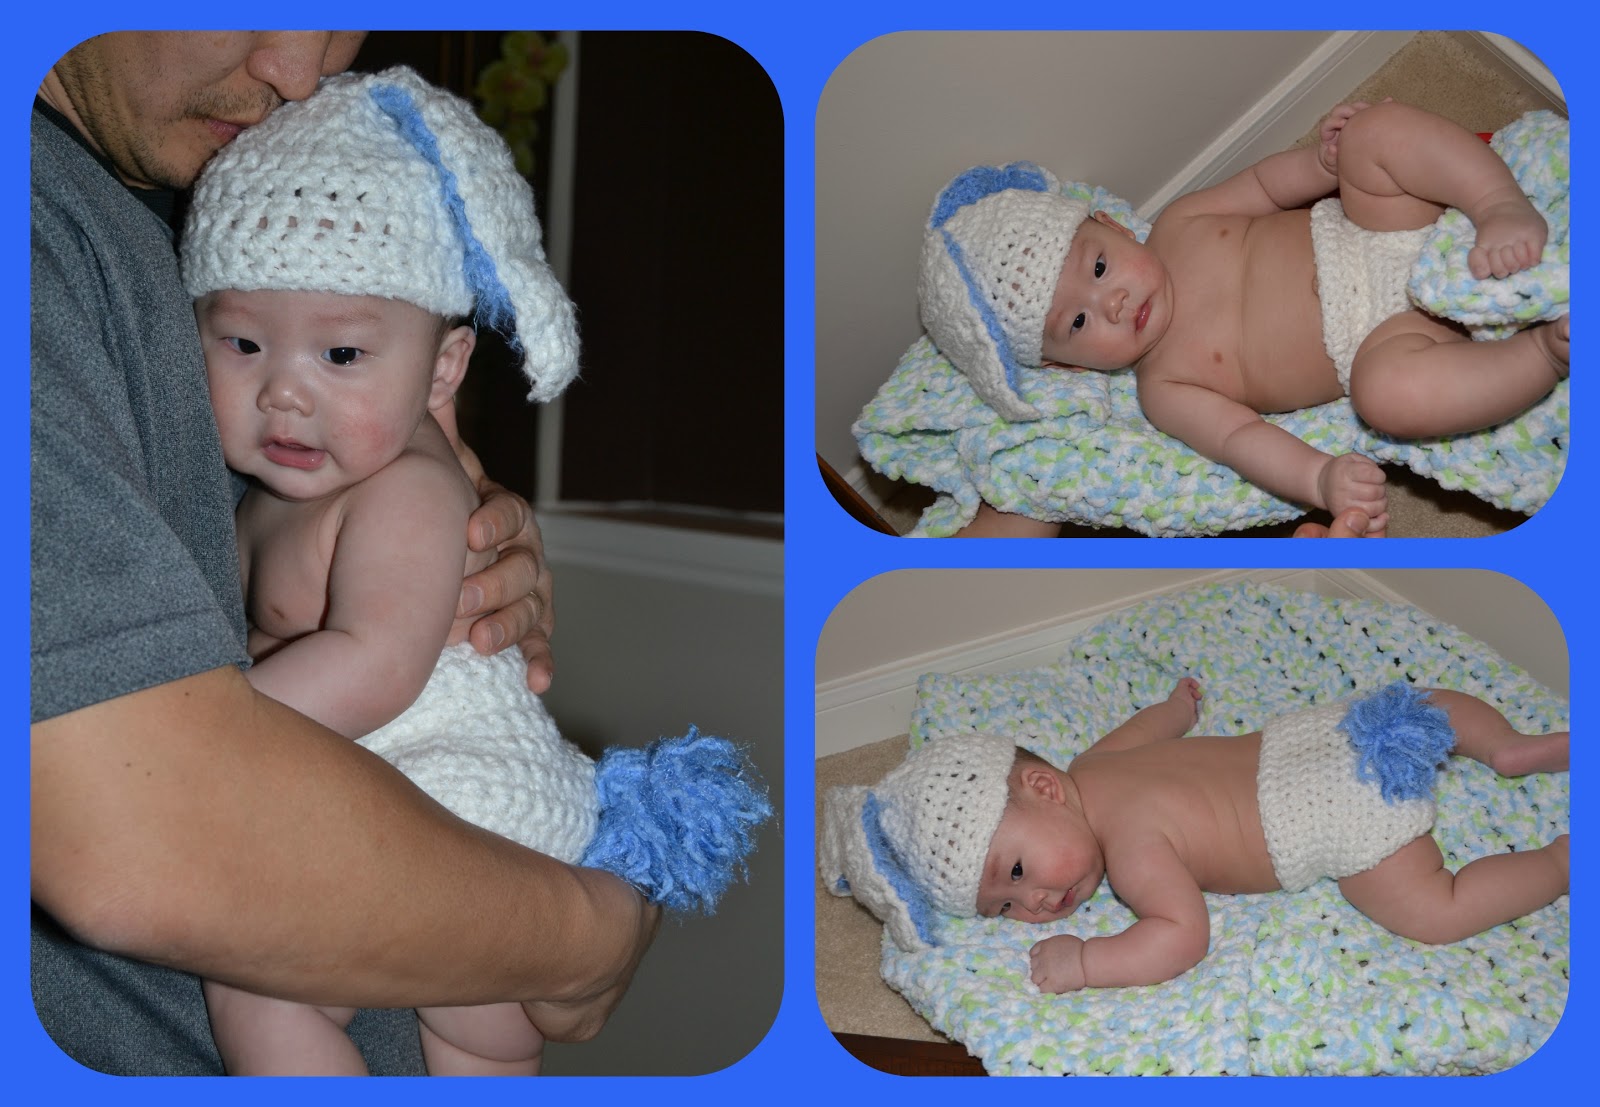
Crochet Bunny hat/ diaper cover free patterns
There is still time to make this really adorable set of Bunny Hat and diaper cover for Easter. I just love love Bobwilson123. I credit her for teaching me how crochet. I've never picked up a crochet needle before I started watching her video. First I bought a pair of knitting needles because a friend said it was easier to knit than to crochet. However, video tutorial for knitting was very limited and I hated just making scarves. You know how long those things take to make. urg! So I switched over to crochet and I've been having fun ever since. Getting my daily portion of fiber every day. http://www.youtube.com/watch?v=1yLhJucsSWM She also has a tutorial for a diaper cover with buttons. But I opted to work this other pattern for the diaper cover because it works up faster. http://www.youtube.com/watch?v=QdgylsDRrUQ Now all I have to do is get some photography lessons. Sometimes what you envision in your mind doesn't always translate. lol

Interactive Scrapbook layout Flip Flap Demonstration
http://www.youtube.com/watch?v=stoO_HqXnbw&list=PL4A0C6B31CD0D5548 I was consultant with Close to My Heart and they sent me these clear Flip Flap. They now come in different sizes for under $5 each. These are just wonderful addition, well actually must haves for your scrapbooking needs. Ever have too many photos from the same event and you just can't choose between them. However, you don't want to have it display on multiple pages of the same event. This Flip Flaps allow you to stack photos on top of each other and still be interactive. You can contact a Close to My Heart Consultant to get yours. http://suburbancrafter.ctmh.com/ My cheap DIY version of this is to purchase loose scrapbooking page protector refills and apply glue to the edge where the punch holes are and fold them over another scrapbook layout. 50 to pack for like $5 use your Hobby Lobby coupons.


Scrapbook Freeze Frame Magic Mesh review/ tutorial
http://www.youtube.com/watch?v=PzwoxUg9o2o&noredirect=1
If you've been scrapbooking for a while you're always looking for ways to help complete your project faster. Let's face we are hardly ever done with embellishing a page. I can work on the same page for hours. I saw this product on Scrapbooking Memories show and was excited about it. So after searching online I found it sold on Amazon. For about $30 it wasn't cheap but I thought I "needed" it. You can watch the two part videos to see how well it works. http://www.youtube.com/watch?v=6vyISo_Ff9k. It does work as advertised but I noticed for small letters you have to work awful fast to apply the glue or save doing those small letters last because by the time you get finish gluing down everything the glue on the small letters have dried up. The mesh is big I would say too big to take to a crop however, it does save time not having to reset your designs layouts.

If you've been scrapbooking for a while you're always looking for ways to help complete your project faster. Let's face we are hardly ever done with embellishing a page. I can work on the same page for hours. I saw this product on Scrapbooking Memories show and was excited about it. So after searching online I found it sold on Amazon. For about $30 it wasn't cheap but I thought I "needed" it. You can watch the two part videos to see how well it works. http://www.youtube.com/watch?v=6vyISo_Ff9k. It does work as advertised but I noticed for small letters you have to work awful fast to apply the glue or save doing those small letters last because by the time you get finish gluing down everything the glue on the small letters have dried up. The mesh is big I would say too big to take to a crop however, it does save time not having to reset your designs layouts.

Saturday, March 23, 2013
12 months applique onesies
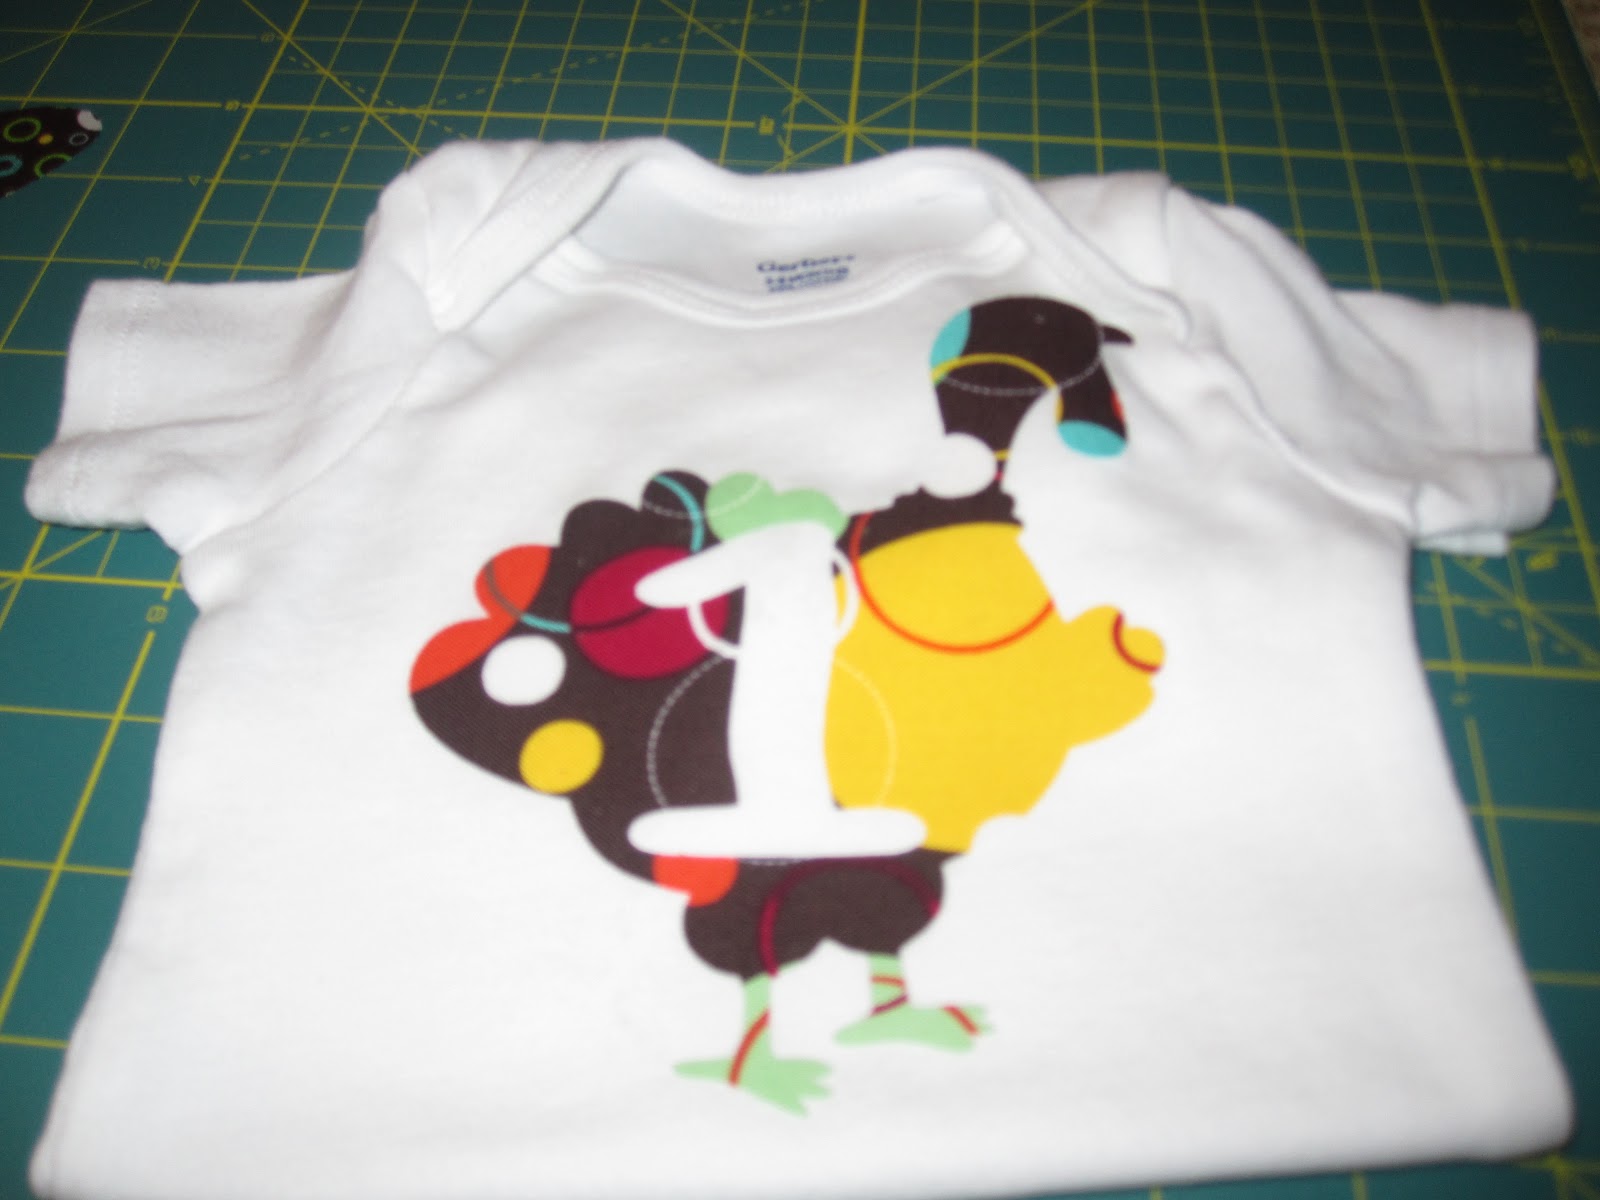


I made this set as a gift for a friend who was expecting. They are super easy to make just need to gather a few materials. I used my Cricut Expression machine to cut out the fabric design (you can use any electronic cutter you like or simply trace and cut out your design then trace it over fabric of your choice).
1. cut image
2. Heat and Bond (strong no sew) they sell them by the yard at Hobby Lobby and Joann
3. iron
Step 1: You can design your image using Cricut Craft Room first. I did four image on one mat. Select the outline image then place the number in the center.
Step 2: If you are using a cricut machine. First lay your heat and bond cut to the size of the mat image you want. Then place it on top of the fabric w/ the right side of the fabric down. Iron over your heat and bond so that it now stick to your fabric. Do not peel off the backing yet. Cut it into the square to fit your cricut cutting mat. I would put four design on one mat. You can place four different fabric prints squares to make months 1,2,3,4 or you can have the same large fabric print but space your months out so that no two months are the same fabric.
Step 3: load your mat and run craft room to cut image
once the image is cut out now peel it off the mat. You can save the cut out numbers for another shirt or projects.
Step 4: position the image to where you like to have it on your shirt and iron on as directed and there you have it.
Now if you're up to the challenge. Instead of getting strong Heat and Bond you can get Heat and Bond Lite. follow all the steps as directed but bust our your sewing machine and zig zag stitch it down for a sew on look.
If you have questions please comment below. There are a couple of trade secrets I may reveal to make it easier. Alright it's using starch. Just spray starch on your fabric to make it firmer more like paper for the machine to cut.
Friday, March 22, 2013
crochet R2D2

DIY Baby Bjorn cover


Love this idea since I have three kids and could use a nice cover for the Bjorn. Buying new from them is too much. Here it's so simple to do. I made mine reversable. I would like to add that I should have made it longer to cover more of the tail because as baby grows I had to adjust the length. I bought these fabric patterns at Hobby Lobby. My favorite craft store. Love how the two color coordinate. I have an old Kenmore sewing machine for over 10 years now. I just purchase a Brother's SE400 but don't want to get ride of this old sewing machine because it's built to last and you just can't find quality like this anymore.
DIY rain gutter bookshelves


I was amazed at how simple this was to make. My husband is not a DIY person and bleeds putting up curtain rods but this was so simple for him to do. Just for $5. You can buy 10ft long rain gutter purchased at Home Depot or Lowes. Buy a few anchor pieces show in picture and a set of end pieces. Drill holes to screw the anchor pieces on after you slide it spaced evenly to balance your shelves. There you're done. If you ever need to redecorate or move just unscrew and fill up the little tiny holes. If you like to paint it in any color you want that takes more time. Great way to display books and kids can see the titles and encourages them to want to read. This is also great for displaying other items as well.
Tuesday, March 19, 2013
Crochet giraffe hat/ embroidery applique


Thursday, March 14, 2013
crochet ribbon/scarf hat


This design you'll need to know hdc, hdc back post, magic circle, net stitch, dc, dtr crochet, shell
I hook to make it faster. Will not join but work in continuous round.
to begin: make a magic circle http://www.youtube.com/watch?v=WLuSVyKvoUg video tutorial here
10 hdc crochet into the circle,
row 2: do not join but place a stitch marker (I use a scrap of yarn as marker or stick a bobby pin). 2hdc the top of 1st st. 2hdc in the next stitch and all the way around for (20)
row 3: *1hdc, 2hdc in next st* repeat all around
Row 4 *1hdc, 1hdc in next st, 2hdc in next stitch* repeat all around
Row 5: * 1hdc, 1hdc in next st, 1hdc in next st, 2hdc in next st* repeat all the way around.
keep adding increase of 1hdc, 1hdc, 1hdc, 1hdc, 1hdc into next st, 2hdc in the next (see the pattern forming for increase) till the circle measure the circumference of the crown of the head size you want.
I made mine up to *1hdc, 1hdc, 1hdc, 1hdc, 1hdc, 2hdc* repeat
then still not joining but move your yarn maker and work a continuous round.
1Row6, 7 add increase
Row 8-9: hdc all the way around
Row 10 1hdc into the back of the next st. just the back not both st., repeat all the way around
Row 11: *1hdc into the next st chain 1, skip next st. 1hdc into the next chain.* repeat all around
Row 12: repeat row 11
Row 13-14: double crochet each st. around
Row 15: Double triple crochet (dtr) each st. around. wrap the yarn 3 times on your hook, you'll have 4 on the hook, insert into the next st, yo, pull up a yarn, yarn over pull through two hoop, yo, pull through two hoop, yo, pull through 2 more, repeat till you have one on the hook.
Row 16: 1hdc all around
Row 17: *sk a st, 1sc in the next, sk a st, 5hdc into next st* repeat all the way around.
where you made the dtr crochet loop ribbon or light weight scarf through evenly every 4 sts.
last part of the pattern was from http://www.headhuggers.org/patterns/cpatt18.htm
Subscribe to:
Posts (Atom)