Tuesday, December 3, 2013

Elf on The Shelf a Sealed Letter from Santa

I never really paid attention to this until this year when I notice quite a few of my friend on Facebook posting photos of all the things their elves were up to. They look like they were having so much fun and who doesn't want to join in on the fun.  So I looked all over and they were all the same in terms of the adoption fee.  I think getting it mail directly was a cool idea since it included everything needed and no need to print stuff out from your own computer.  However, I also like a good deal.  Bed Bath and Beyond offer the elf for adoption and allows you to use your coupon ;-)
I introduce the elf to the children without touching him.  It was later in the evening so I had to wait to register him but my internet provider serve failed so I was not able to print it that night to have for them in the morning.  But that gave me additional time to make the authentication even more special.  Later that day I showed them the kids the Adoption Certificate and the special sealed letter straight from the North Pole from Santa.  My kids both agreed to name the elf Jerry after their favorite cartoon character from Tom and Jerry. lol
I also found this great link to a wonderful mom who thought of ways to incorporate faith and holiday tradition.  She also included a special letter from Santa to explain how the elf will teach them more about Jesus and the true meaning of giving and Christmas.  Elf On The Shelf Jesus Style  you can click and print out your own letter.
 Certificate of Adoption when you register your elf at Elf on The Shelf
 Day 1: Our Jerry elf hanging on the Nutcracker lol.
I can't wait to show you what Jerry will be up tomorrow.

Saturday, November 23, 2013

DIY Fabric Babygate, love it!

We need to install a baby gate at the bottom of the stairs but my husband hates to drill holes in the wall and he doesn't want to mess with the stair case.  We tried different ways to block the stairs but our little guy is such a climber.  I'm so glad I saw this idea on pinterest and I had some fabric on hand that would make it cost effective.
  Here is the link.  Instead of using batting I had some quilting fabric which already has a light batting in it.  I really like the duct print I got from Hobby Lobby it makes it look like an iron gate.  

I also saw this other one where she added ribbons instead of velcro.
  we used ottoman to block the base of the stairs  but he would push it out and climb up still.  So we weigh down the ottoman and found him climbing over it.  
 we added a gate but he found a way to wedge himself through.  We couldn't secure this gate down without also blocking out our other preschooler.  The front entrance look a mess.  So I'm really glad we saw this idea of a fabric gate not for the top of the stairs of course but for the bottom I think it works.  
 I have a Brother SE400 with is a sewing and embroidery machine.  So I embroidered some Bible verses I found for free online.  Free downloads link .

Embroidered Fabric Baby Gate free designs

I made this fabric baby gate but thought I would embroider some Bible verses to it.  Design by Juju
I found this website that offers free Bible verses download in various sizes and formats.  Take a look.

Friday, November 8, 2013

Embroider Machine Applique

Oh this is too easy I wonder why it took me so long to try it out.  I was a little intimidated but it's not hard at all.  Look at my first project.
 I saw this race track alphabet set on Planet Applique if you act fast they have a sale going on now!  This whole set was $8 and I spent $10 so I received 3 other alphabet set for free!  
I'll update with step by step photos later.  I just want to let you guys know about the awesome sale going on weekly. 
Oh my I stumbled on this other site.  Free Bible Verse images with 75% off right now!  and if you look at they link they offer a tutorial on how to applique so no need for me to take any photos or videos to show you.  


1st Birthday Candy Land Theme

I can't believe how fast time flies.  My baby who was born premature at 34 weeks is now a 1 year old.  We celebrated his miraculous birth by having dedicated to the Lord at church.  Then we continue with the birthday celebration with fun and food.  Most of everything I made myself with the help of pinterest and youtube of course.  Everything I'm going to show you will include DIY links (I'll post as I go)
 
here is the link for the pom pom
   Giant Pom Pom for gum drops
Giant size lollipops.  
 Milestone Chalkboard made by  Three Lemons and Berry
 Free Candy Land print out for water bottle or cup cake.  
 Make your own Smash Cake ! Diary Free/Egg Free recipe
 color ice cubes pink lemon aid
 I have to capture photos of my little guy so I built my own back drop from this tutorial

DIY Smash Cake for beginner diary free/egg free recipe included

So for my son's 1st Birthday Candy Land Theme I was looking for a Smash Cake Butter Cream Icing I love this link because you can adjust the serving size.  I substituted for soy milk and used I Can't Believe It's Not Butter for all diary ingredients.  I skipped meringue powder because I couldn't find it in the baking aisle.  I probably didn't know what it look like to look for it.  Separate portions out and add food coloring if you like.
  They are so popular for photo op.  I was also looking for a diary free one and couldn't find local bakers to make one for me. I saw this cake on Pinterest.  Of course where else would you find anything your heart desires to make.  I have to say I'm not a baker.  I mess up recipes all the time but this time I solicited the help of my friend in CA.  Boy can she bake you a cake.  Her work is amazing.  She sent me a few online links for tips.  First how to make your own buttercream frosting because the can frosting will not hold the shape it's too soft to decorate on.
This is how to frost the cake to make it flawless.  This gives it the look of fondant but taste so yummy.   You can just bake a cake out of the box and it'll work too even though they are softer.  However for a diary free and egg free my friend gave me this recipe.

 It's called Crazy Mixed Up Chocolate Cake:  3 cups unsifted all purpose flour, 1/2 cup of unsweetened cocoa, not Dutch process (whatever that means), 1 teaspoon salt, 2 cups sugar, 2 teaspoons baking soda, 2 tablespoons of white or cider vinegar (that's right vinegar!), 2 teaspoon of vanilla extract, 2/3 cup of vegetable oil, 2 cups of lukewarm water.  Pre-heat oven at 350 degrees.  place a sifter over a bowl and sift all your dry ingredients together then add in all your other ingredients and mix.  Or you can do what I did and that was to just mix everything without the sifter because I miss this step.  You can now pour mixture into your baking pan.  Smash Cakes are normally about 6" so get two of those.  I wrapped the pan with these Wilton Bake Even Strips soaked with water so that the cake will have a more flat top.
For the decoration I just use candies.  I made the lollipop with twister string in red and green color.  For the ice cream topping.  I just used extra pieces of cake and rolled it into a ball.  Frosted it with icing and tripped some melted chocolate chips.

DIY giant Pom Pom hangers

These were part of my Candy Land Theme "Gum Drop Mountains"
they took about 5 minutes to make.  What you'll need:  Tissue paper (any color you like), something to tie with.  I used fishing lines makes it have an invisible string when dangling.  Also use pipe cleaner to tie and make a circle to loop the string through.
  I just lay all the tissue paper that comes in a pack evenly on top of each other.  About ten sheets.  Then I accordion fold them together 
  Then I folded it down the middle.
 I tied the pipe cleaner and made a circular loop to put my fish line through to hang later.  
It is rather thick to cut through the whole thing so cut a few at a time.  Cut one side then the other into any shape you like.  I did a scallop shape here.  
Next you'll fold one sheet down at a time.  Starting with one side then the other side.  Flip it over and do the other end.  You'll have a big pom pom afterward but you'll need to hang it or else it'll get misshapen.  I saw it on a youtube link I'll add once I can find it again.  

Marshmallow Shooter DIY

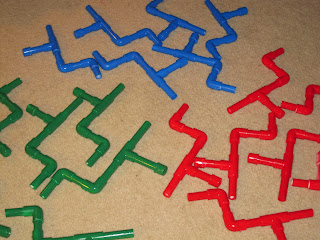
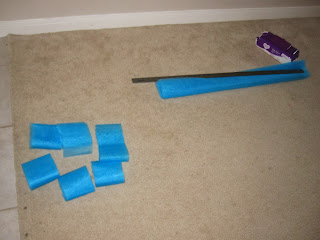
I saw these tutorial for the marshmallow shooter another one
and knew my boys would have so much fun and it fits with the Candy Land Theme!  Now they didn't mention this in the other post but in order for your spray paint to stick well.  You'll have to lightly sand down your your plastic pvc pipes.  Just lightly make one pass is fine.  I stuck the completed shooter on a chopstick (stainless steel easy to clean) then spray.  It dries nicely.
  It really works!  Shoots clear across the room warning don't shot anybody in the eye.  You could also use craft pom pom too instead of marshmallows.

How to make Pom Pom Tulle Wand in multi-colors DIY

I made Pom Pom wands
as a party favors for the girls at my son's 1st birthday Candy Land theme.  I made marshmallow shooters as a party favors for the boys.
The materials you'll need to gather are:
      1.  tulles (I bought mine by the yard it's cheaper and you can get much more pom pom than the
      spool one.  It was 3 yards of whatever color I wanted.  I picked green, pink, red, blue.  I'll show
       you how to cut these out down below.
      2.  something to make the wands.  You can get dowels and decorate it with ribbons.  But I found
      these glitter pencils that were long enough.  Plus if they want to sharpen it they can be use as a
      pencil.
      3.  glue I used E6000 can be found at #Hobby Lobby.
      4. your template

I found a really great idea for the template that was so much better than any other templates I saw and this works so much better when you want to add multiple colors tulles.  Video tutorial for the Pom Pom.  I made my template out of paper box from one of my kid's toy.  I traced the lid of a pot to make the outer circle and then I traced a smaller spray can for the inner circle.

before I continue let me show you how I cut up the three yards of fabric.  You'll have handy when you start to wrap it around the template.  
  Your fabric by the yard will come folded up so you want to unfold it into one fabric piece then roll it up just like the picture and cut about 4" apart.  You'll be able to make a few this way.  I chose several colors for my pom pom.  

 to get started you'll need to cut 12" of tulle from the 3 yards you folder and cut earlier.  Slide one end into the circle slit and slide the other end into the other slit.  Now it's time to wrap your tulles.  
 Keep wrapping till you run out.  Now if you get to the end and there is a bit sticking out you'll want to trim that down.  
 wrap the other colors on top of the previous color.  
 my green tulle ended here so I just start wrapping my blue tulle color on top of the green.  Once you're done adding all the colors you want.  I added another red color after this.  You will pull to tie the pink strip together.  It doesn't need to be really tight just enough to keep it together.  Then you will slowly cut down the center of your folded template making sure not to cut into the cardboard template itself.  
  Now tighten the pink tulle strip together and you'll see that you have a pom pom.  I attached my pom pom with E6000 glue make sure it's well ventilated.  Just use a dowel or in my case I found some really decorative glitter pencils.  I put glue on the eraser part of the pencil and place it down on the middle of the pom pom where I tied it up and held it in place for a little bit for the glue to take.  Then I stuck it in a bottle to let it dry some more.  Really cute results.  
I stuck some in the blinds for decorations!