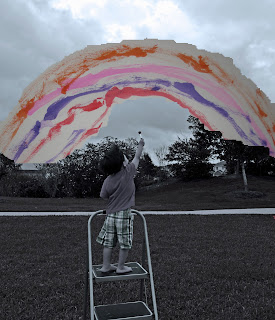
I am really having a lot of fun figuring out how to use photoshop element 9 to create fun photo keepsakes. It's difficult to say which is harder trying to get your child to pose for the right effect or messing around with photoshop. Well, I'm going to try and help with the photoshop part so good luck on capturing that perfect pose. Open the iphoto icon on your dock. Select under iphoto Preference. click on the Advance icon and select Use Raw. Click on General and select In Adobe Photoshop element. Then an PSE will pop up click on the Open button. Click on the image you want to import over to Adobe. For the first picture up top create another layer for the Text. Type out your child's name in desire font. Size your text. Highlight each letter and select the color you like per letter if you choice. I added a date to the bottom corner. For the second photo once you get your photo imported into PSE you can change it to black and white by selecting Image--Mode--Grayscale. Or you can slowly change the saturation, hue, lightness, sharpness to whatever shade you like. Create another layer and import your child's artwork. Grab the rainbow and drag it into the black and white photo. Click on the rainbow to size it where you want. In order to see the other black and white photo underneath to know where you want to move the rainbow just change the Opacity from 100% to around 63% enough to see through. Then click on the erase tool and erase away the paper outline of the rainbow to what you like. change the Opacity back to 100% and your artwork is on top of your black and white photo. I love this idea from
Smart Class Blog. I realize that the effect looks much better if each layer of rainbow color is nice and thick leaving no space between. Still looks cool though. Here is some bloopers photos.

"get your hand out of your shorts please" He did it on purpose and laughed.

He simply had enough and will not stand to "paint the sky" anymore as he realize the rainbow I said he would paint didn't appear. However, he had a grand time painting his own rainbow on paper.

 I am really having a lot of fun figuring out how to use photoshop element 9 to create fun photo keepsakes. It's difficult to say which is harder trying to get your child to pose for the right effect or messing around with photoshop. Well, I'm going to try and help with the photoshop part so good luck on capturing that perfect pose. Open the iphoto icon on your dock. Select under iphoto Preference. click on the Advance icon and select Use Raw. Click on General and select In Adobe Photoshop element. Then an PSE will pop up click on the Open button. Click on the image you want to import over to Adobe. For the first picture up top create another layer for the Text. Type out your child's name in desire font. Size your text. Highlight each letter and select the color you like per letter if you choice. I added a date to the bottom corner. For the second photo once you get your photo imported into PSE you can change it to black and white by selecting Image--Mode--Grayscale. Or you can slowly change the saturation, hue, lightness, sharpness to whatever shade you like. Create another layer and import your child's artwork. Grab the rainbow and drag it into the black and white photo. Click on the rainbow to size it where you want. In order to see the other black and white photo underneath to know where you want to move the rainbow just change the Opacity from 100% to around 63% enough to see through. Then click on the erase tool and erase away the paper outline of the rainbow to what you like. change the Opacity back to 100% and your artwork is on top of your black and white photo. I love this idea from Smart Class Blog. I realize that the effect looks much better if each layer of rainbow color is nice and thick leaving no space between. Still looks cool though. Here is some bloopers photos.
  "get your hand out of your shorts please" He did it on purpose and laughed.
  He simply had enough and will not stand to "paint the sky" anymore as he realize the rainbow I said he would paint didn't appear. However, he had a grand time painting his own rainbow on paper.